
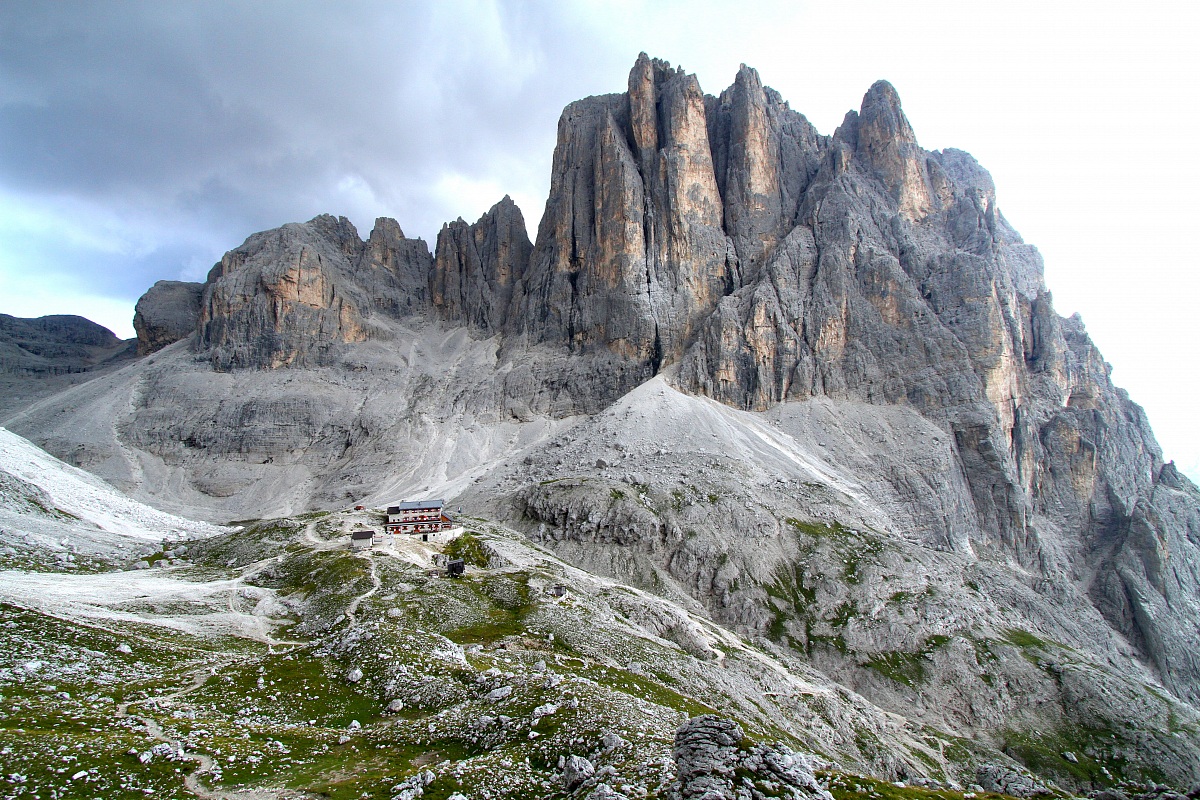
The trek to the Rifugio Velo della Madonna mountain hut (Italy, Dolomites) is quite challenging, even though it’s a hiking trail. The hut itself is located at an altitude of over 2,000 meters and attracts tourists and travelers with its breathtaking mountain scenery. It’s arguably one of the most photogenic spots in the Alps. But the trail to the hut presents some challenges for the unprepared hiker.
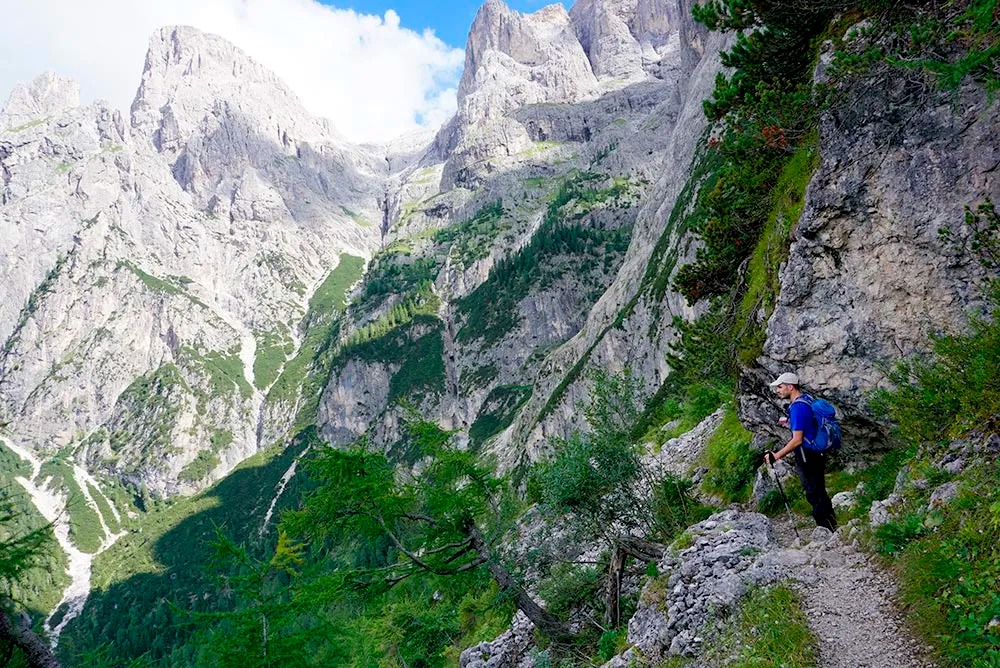
The second half of the trek to Rifugio Velo della Madonna begins with dangerous sections that have exposure (route exposed above a cliff). This means that a section of the trail runs along a narrow ledge or slope with a steep drop nearby. The trail itself may not be technically difficult, but it can be psychologically dangerous: if you slip, the risk of falling is high. Therefore, on routes with “exposure,” good footwear, attentiveness, and sometimes safety equipment (railings, helmet) are required.

")
General characteristics of the route:
-
Location: northeastern Dolomites (Italy), near Val di Fiemme / Val di Cembra.
-
Rifugio’s altitude: 2358 m
-
Route type: Mountain trail with possible rocky sections, partly via ferrata.
-
Duration: 3–5 hours one way (depending on starting point and fitness).
-
Difficulty: Medium/Hard (Alpine hiking / moderate via ferrata).

Dangerous places along the route:
-
Exit from the forest (Val di Roda → alpine meadows)
-
After passing through the forest section, the trail becomes rocky.
-
Here the first narrow sections appear, where the cliff is already noticeable on the side.
-
Danger: Slipping on fine scree.
-
-
Middle of the climb (rock shelves and scree)
-
The trail runs along a slope, with rocks and fine scree underfoot in places.
-
On the right side is a steep downward slope, on the left is a wall of rocks.
-
Danger: If you encounter a group of touristsIt can be crowded – you have to give up space at the cliff.
-
-
The final section before the hut
-
The most exposed section. The trail turns into a narrow ledge beneath the steep cliff Velo della Madonna.
-
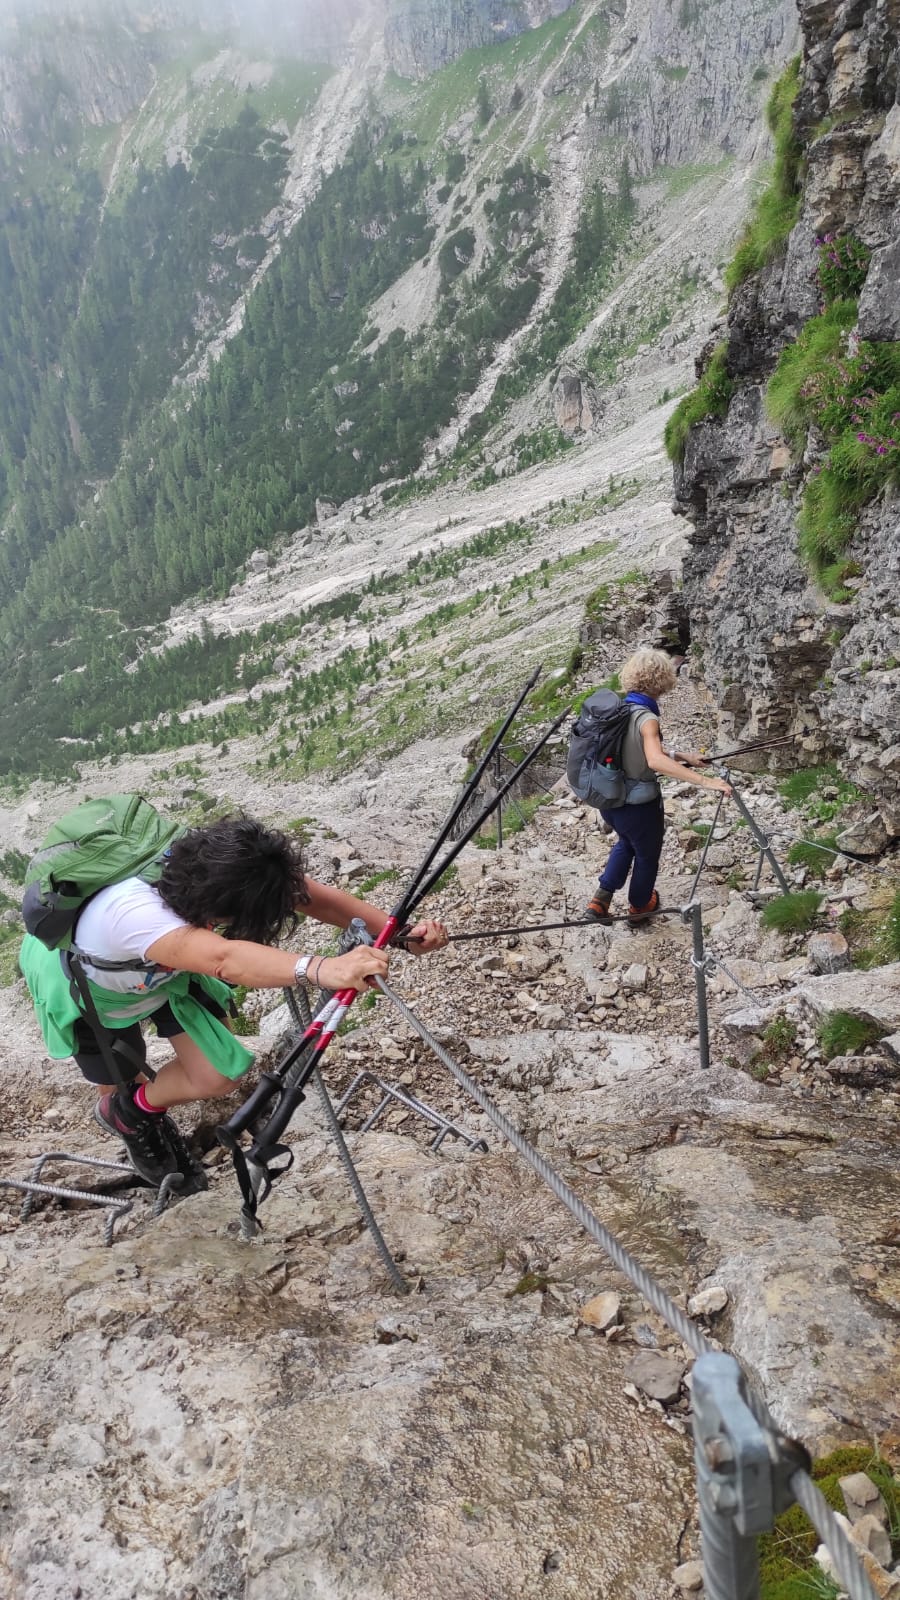
There are safety ropes (via ferrata style) here that you can hold on to.
-
To the side is a sheer cliff, with a view down to San Martino di Castrozza.
-
Danger: In strong winds or rain, walking becomes very risky; the rocks are slippery.
-

-
Approach to the Rifugio site
-
The last meters are stone steps and narrow rocky ledges.
-
For an unprepared person, the height and openness of the route may be psychologically difficult.
-


How to safely complete the Velo della Madonna route
🔹 1. Preparing before leaving
- Check the forecast: avoid going out in rain, thunderstorms, or strong winds.
- Wear trekking boots with stiff soles.
- Take a helmet (rockfall and risk of falling rocks). Stock up on water and light food.
🔹 2. Trailhead (San Martino di Castrozza → Val di Roda)
- The first part goes through the forest, then you emerge into meadows. There are no serious dangers here yet, but the trail is already gaining altitude.
- Tips: Take your time, walk at a steady pace.
🔹 3. Middle section of the route (Val di Roda → rocky areas)
- The trail narrows, and small scree and rocky ledges appear. There’s a cliff on one side, and a downward slope on the other.
- Danger: You can trip when meeting other hikers.
- Tip: Always stay close to the cliff, give way carefully.
🔹 4. The final section (approach to Velo della Madonna)
- The most exposed part of the route. A narrow path under a cliff, with a cliff nearby. Safety ropes are strung here (via ferrata style).
- Danger: slippery rocks after rain, psychologically challenging due to the exposed height.
- Advice: hold on to the rope, go slowly, step by step.
🔹 5. The last meters (approach to the Rifugio)
- Stone steps and narrow ledges lead directly to the hut.
- The danger is minimal, but fatigue can take its toll.
- Tip: Pause before the final push to catch your breath.
Navigation
-
The route to the Velo della Madonna hut is marked with red and white markers, but the trail partially passes through scree and saddles, where the markers are less visible.
-
It’s easy to lose your way in fog or poor visibility.
The Route to the Rifugio Velo della Madonna – A Step-by-Step Guide
Start: Parking lot / Village at the Foot
-
Altitude: 1300–1400 m
-
Time: 0:00–0:30
-
Features: lightweight A path through the forest.
-
Dangers: Slippery roots after rain.
-
Recommendations: Boots with tread, check your gear, and bring trekking poles.
Stage 1: Forest Climb
-
Altitude: 1400–1800 m
-
Time: 0:30–2:00
-
Features: Steep forested slopes, winding trail, occasional rocky ledges.
-
Hazards:
-
Slipping on wet roots and rocks.
-
Possible wet areas after rain, slippery ground.
-
-
Recommendations:
-
Use poles to maintain balance.
-
Walk slowly on steep sections.
-
Follow the signs (red and white tags).
-
Stage 2: Scree/Saddle
-
Altitude: 1800–2050 m
-
Time: 2:00–3:00
-
Features: open rocky slopes, scree, areas with metalAllied ropes (mini via ferrata).
-
Dangers:
-
Rocks can slip underfoot.
-
Ropes are slippery in wet weather.
-
Area with a cliff, a fall is dangerous.
-
Stage 3: Upper Rocky Trail
-
Altitude: 2050–2200 m
-
Time: 3:00–3:30
-
Highlights: Open trail, valley views, gradual climb.
-
Hazards:
-
Winds can be strong at altitude.
-
Scree continue, the risk of slipping remains.
-
-
Recommendations:
-
Sturdy footwear is required.
-
Continue to use trekking shoes Sticks.
-
Stage 4: Approaching the Rifugio
-
Altitude: 2200–2300 m
-
Time: 3:30–4:00
-
Highlights: The trail emerges onto an open plateau, with the Rifugio visible from afar.
-
Dangers:
-
Rocks and protruding rocks.
-
When In bad weather, there is a risk of frost/sleet even in summer.
-
Finish: Rifugio Velo della Madonna
-
Altitude: ~2300 m
-
Time: 4:00–4:30
-
Features: A place to relax, food and water, panoramic views.
-
Recommendations:
-
Relax for at least 30 minutes.
-
Plan your return trip in advance, taking into account the time before sunset.
-
✅ General safety rules
- Never start climbing after lunch—daytime thunderstorms are common in the mountains.
- Check the weather forecast, especially for thunderstorms and wind.
- Always have extra water and food.
- Use belay on via ferrata sections.
- Have a route map or GPS—the trail can be partially lost on rocky terrain. sections.
- If you feel tired halfway through the route, it’s best to turn back.
- Don’t go alone: there should be at least one companion or guide nearby. Be sure to inform someone below about your planned route.
Description source: alp.org.ua